

Download Source Files
- Source files for this tutorial are available to Premium members.
Get a Premium Membership
Final Image Preview
Below is the final image we will be working towards. Want access to the full Vector Source files and downloadable copies of every tutorial, including this one? Join Vector Plus for just 9$ a month.Tutorial Details
- Program: Adobe Illustrator CS4
- Difficulty: Intermediate
- Estimated Completion Time: 1.5 hours

Step 1
Open a new blank document. The size doesn’t matter for now. In the end we’ll crop the artboard to the illustration. Let’s start by creating the eyes of the owl. Draw an orange circle with the Ellipse Tool (L) (1a). Fill it with the gradient you see in image 1b, with colors ranging from light orange to dark red. Draw a dark brown pupil also (1c).
Step 2
The eye needs a couple of highlights. Draw a light orange ellipse in the top-right corner of the eye (2a) and set it to Screen, with 50% Opacity from the Transparency palette (2b). Add a secondary highlight in the bottom-left corner (2c), move it below the pupil and reduce its Opacity to 30% (2d).
Step 3
Let’s add an internal shadow. Copy the secondary highlight behind the first one and enlarge it (3a). Fill it with the same color as the pupil and set it to Multiply at 25% Opacity (3b). Go to Effect > Blur > Gaussian Blur and choose a Radius of 5 pixels (3c). We added a nice depth to the eye (3d).
Step 4
Select the main orange circle then go to Object > Path > Offset Path and and enter 5 pixels (4a). Make the new circle very dark (4b). The eye is finished so group all objects together and create the second eye. Place a guide right between them (4c).
Step 5
Let’s draw the beak now. Activate Smart Guides with Command + U then draw the right half of the beak using the Pen Tool (P), while snapping to the guide (5a). Make sure the first and last points have horizontal handles (5b). Create the left half by copying and flipping horizontally the one you just drew.Grab the Direct Selection Tool (A) and use it to select the top points. Hit Command + J to join them: from the pop up dialog choose the Smooth option (5c). Do the same for the bottom points. We now have a single shape for the beak and because we kept the handles of the endpoints horizontal the joints don’t have any kinks (5d).

Step 6
The beak is definitely out of scale and proportion with the eyes so let’s adjust it (6a). Go to Object > Create Gradient Mesh and choose 3 rows and 4 columns (6b). Take a look at the instructions in image 6c to color the mesh properly. The result (6d) shows the finished beak: notice the frontal highlight and the shadows at the seams.
Step 7
To create the nostril draw a small brown ellipse at the top-right corner (7a). Fill it with a gradient to give it some depth (7b) then mirror it to complete the pair (7c).
Step 8
Let’s draw the head now. Create two overlapping circles around the eyes and join them into a single object: the spectacles (8a). Create the head with a brown ellipse (8b) and fill it with a gradient (8c) to imply light coming from the top (8d).
Step 9
Select the beak (not the nostrils) and go to Effect > Stylize > Drop Shadow and enter the settings shown in image 9a. Add a drop shadow to the eyes too (9b) and see the result (9c).
Step 10
Create the egg-shaped body (10a) and fill it with the same gradient as the head. Duplicate the head, move the copy behind it and below it (10b). Add a Gaussian Blur effect (10c) and set it to Multiply with 50% Opacity (10d). The values used for the effects may be different for you, depending on the size of your document and the raster effect settings. Just try to obtain similar results.You can see that the head’s shadow appears on the background too. We need to crop it to the body. Make a copy of the body and move it above the shadow. Select both this copy and the shadow and hit Command + 7 to create a clipping mask (10e). Now the shadow is cast only onto the body (10f).

Step 11
Let’s finish the head by adding a wedge of lighter plumes. Using the guide as reference draw the right half of the wedge and make it bigger than the head. Don’t worry about the weird shape, we’ll crop it to the head with a clipping mask later (11a).Mirror the other half and join into a single object like we did earlier with the beak (11b). Use a copy of the head to create a clipping mask (11c) so the wedge is perfectly cropped (11d). Make it less conspicuous by switching to Soft Light mode with 70% Opacity (11e).

Step 12
Let’s add a patch of lighter plumes on the belly. Duplicate and stretch the body and set it to Screen mode (12a). Go to Effect > Distort > Zig Zag and use the settings in image 12b to add variation to the outline (12c). Now go to Effect > Warp > Fisheye and use the settings shown in image 12d. See how the outline is a bit more dynamic now (12e).
Step 13
Use a clipping mask to crop the belly to the body. You know the method by now because we’ve used it twice already (13a). With the belly selected create a new style in the Graphic Styles palette by clicking on the appropriate icon at the bottom. Apply the style to the spectacles and the wedge (13b). You might need to manually adjust the settings of the individual styles to make up for the objects having different shapes and sizes.
Step 14
Draw the left wing with the Pen Tool (P) on its separate layer above the body and below the head (14a). Fill it with a two-tone brown gradient so the wing becomes darker as it recedes from view (14b).
Step 15
Take a copy of the wing and move it below it. Rotate it counterclockwise around the top edge (15a) and set it to Multiply mode (15b). Now it’s darker (15c). Add a Gaussian Blur effect (15d) so it looks like a real shadow. Use a clipping mask to crop it to the body (15e). Mirror the other wing (15f).
Step 16
Let’s draw a feather now. Create a light brown circle (16a) and delete its bottom point (16b). Mirror this circle and move it down (16c). Press P to select the Pen Tool and join the open circle by drawing the straight sides (16d).
Step 17
This feather looks like a band aid! Let’s fill it with a gradient (17a) to give it a better appearance (17b).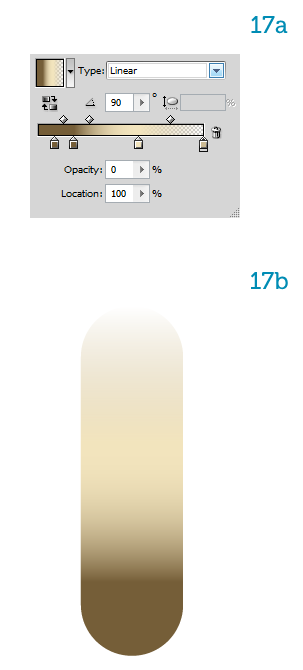
Step 18
Draw a straight path down the middle (18a) and apply a tapered brush (18b). Use a light beige (18c). The feather is complete.
Step 19
Now place many instances of the feather on the left wing (19a). Group them together and set them to Hard Light with 75% Opacity (19b). Mirror the feather to the other wing (19c). Populate the owl’s belly with feathers, too, using less opacity, about 50% (19d).
Step 20
Time to draw the branch now. Using the Pencil Tool (N) draw a fairly irregular shape (20a). Fill it with a brown gradient set so the top is lighter (20b).
Step 21
Draw the bark texture with the Pencil Tool (21a) and crop it to the branch with a clipping mask (21b). Set the bark objects to Color Burn mode with 15% Opacity (21c) to blend the texture with the main color (21d).
Step 22
Arrange the owl behind the branch (22a). We can now draw and position the owl’s toes and claws. On a new layer draw a teardrop-shaped claw (22b). Make two smaller copies (22c) and set them both to Screen mode. Blend them with the main claw with a 5px Gaussian Blur effect (22d).
Step 23
Draw the toe behind the claw (23a) and fill it with the gradient shown in image 23b. When you’re done group the three claw shapes and the toe together. Position the toes on the branch, three per side. Rotate and translate the toes so they follow the bulging outline of the branch (23c).
Step 24
Now let’s set up the final composition. Hit Alt + Command + P to select the Document Setup. From the pop-up window press the button labeled Edit Artboards (24a). Resize the artboard so it’s square and it fully encloses the branch without showing its ends (24b). Click on any icon in the toolbar to return to the drawing mode.
Step 25
On a new layer draw a square that covers the entire artboard and fill it with a multicolored gradient (25a). For the color stops (25b) try to recreate the sky at dusk. The orange and purple shades represent the horizon. With the Pencil Tool (N) draw some sketchy mountains and fill them with desaturated gradients, to suggest depth (25c).
Step 26
The moon (26a) is a perfect circle, cropped to the artboard and filled with the radial gradient shown in image 26b. Go to Effect > Stylize > Outer Glow and use the settings from image 26c.
Step 27
Draw the stars with a lot of small white circles set in Overlay mode. Try to vary their size and opacity (27a). Finally add a drop shadow to the toes (27b). The illustration is done (27c).
Conclusion
Hopefully this illustration didn’t turn out spooky. As always, it was fun to make. I hope you learned an interesting workflow which combines basic shapes, basic gradients and a few effects to achieve a simple but pleasant result.Subscribe to the Vectortuts+ RSS Feed to stay up to date with the latest vector tutorials and articles.
Nenhum comentário:
Postar um comentário